How to create Facebook Ads with WhatsApp button , Optimize Your Facebook Page Preview in the News Feed , Easily Create Videos From Blog Posts

How to Create a Facebook Ad That Works With WhatsApp Business

Wondering how to create a Facebook ad that integrates with WhatsApp Business?
In this article, you’ll discover how to set up a WhatsApp Business account and use Facebook ads to let WhatsApp users call or message your customer support team with a single click.

Why Combine Facebook Boost Posts With WhatsApp Business?

WhatsApp has more than 1 billion daily active users. Many small business owners use the platform to handle orders, address customer service inquiries, and manage customer relationships. However, the process can be burdensome through a personal account.
That’s where WhatsApp Business comes in. It allows you to personalize your business brand on the platform and stop using a personal phone number to communicate with your customers. WhatsApp Business initially rolled out in Indonesia, Italy, Mexico, the UK, and the U.S., but users in most other countries should be able to download it now.
The app is Facebook’s first attempt to help small- and medium-sized businesses improve their customer service on WhatsApp. You can create a business profile with relevant information for your customers such as contact information, a description, a business category, and more. You can also set up automatic messaging and create custom labels to organize conversations.
Set up a business profile in WhatsApp Business.
In addition, Facebook is rolling out the ability for businesses to send traffic ads to their WhatsApp number by boosting a post. When users click the Send Message button in the ad, WhatsApp opens on their mobile device where they can chat directly with the business. When the business receives the message from the person who clicked the ad, they can start a conversation.

#1: Set Up a WhatsApp Business Account

WhatsApp Business is free and currently available for Android users only. You can download the Android app from the Google Play store.
After you install the app and agree to the termsenter a phone number for your account. It must be a phone number that can receive messages via SMS. Keep in mind that you can’t use the same phone number for both a WhatsApp personal and business account.
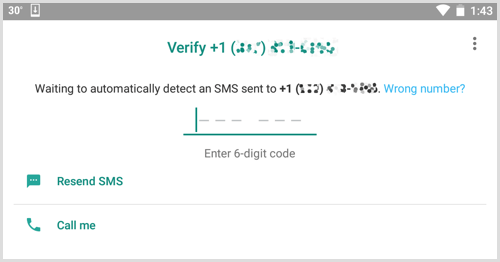
WhatsApp Business will then send an SMS message to your phone. Enter the six-digit code in the app to verify your number.
Enter the verification code you received in WhatsApp Business.
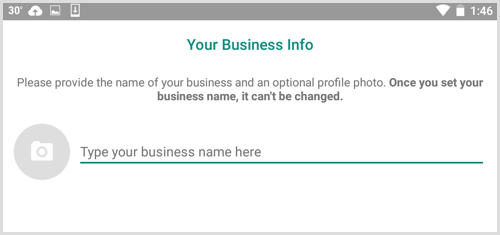
Next, type a name for your business. WhatsApp has some guidelines for creating a business name. Keep in mind that you won’t be able to change the name at a later date. When you’re finished, tap Next.
Type your business name on the Your Business Info screen in WhatsApp Business

#2: Fill Out a Profile for Your Business

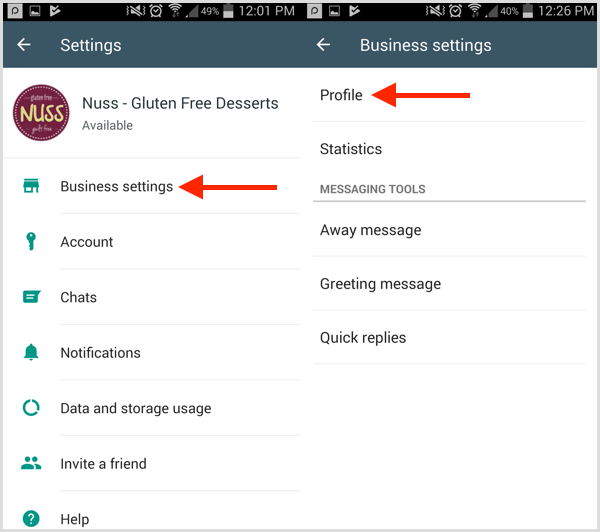
Once you’ve created an account for your business, you’re ready to set up your profile. Tap the menu icon (with the three dots) in the upper-right corner of the screen and select Settings. On the Settings page, navigate to Business Settings and then select Profile.
To set up a profile in WhatsApp Business, tap Business Settings and then Profile.
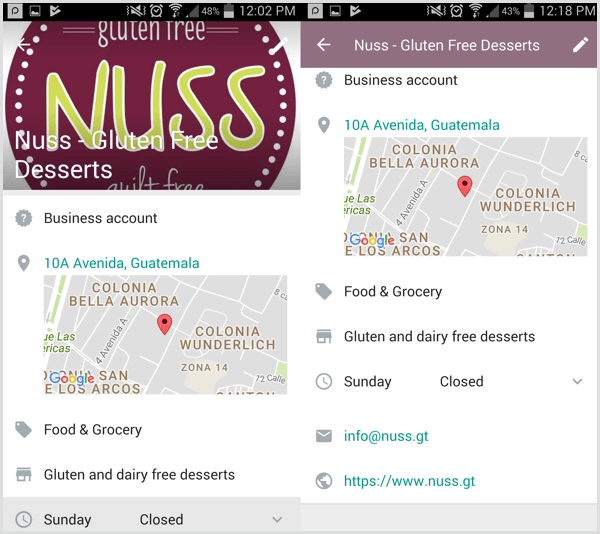
When you fill out your business profile, include information that will be helpful to customers and prospects such as a business description, URL, email address, and location. When you’re finished, tap Save at the top right.
Fill in the details you want to include in your WhatsApp Business profile.
Now you’re ready to start using your account, and interacting with customers and prospects.

#3: Set Up Automated Responses for Commonly Asked Questions

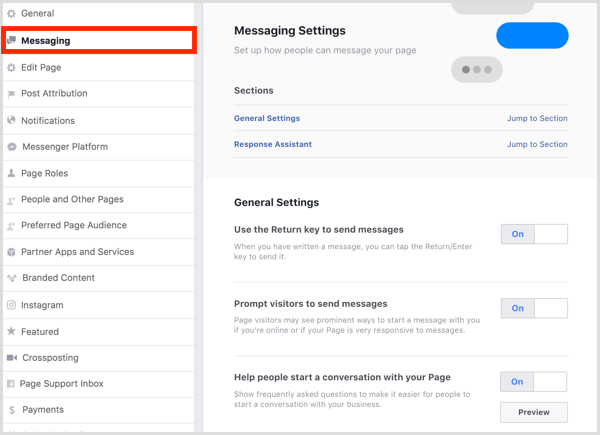
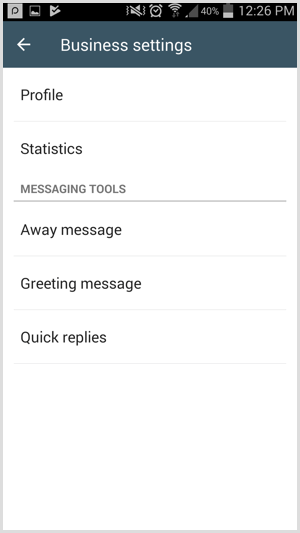
In Business Settings, you’ll find options to set up quick replies, and away and greeting messages. Setting up automated messages helps you improve communication with customers and provide the information they’re seeking.
Access Messaging Tools on the Business Settings page in WhatsApp Business.
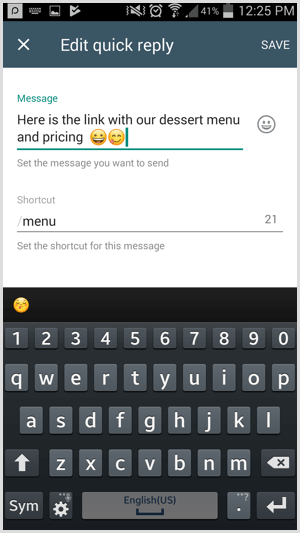
For example, you can send automated links with menus and orders, or provide other key information that customers often request.
Set up a quick reply on the Edit Quick Reply page in WhatsApp Business.

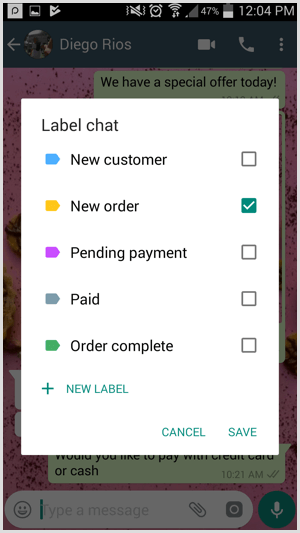
#4: Create Labels to Organize Conversations

Conversation labels are a handy feature that allows you to organize your messages with current customers. Using your own custom labels lets you move conversations along your sales funnel and have a process in place for your customer service team to manage conversations on the platform.
For instance, if you’re a retailer, you might use labels to identify which customers you need follow up with and where they are in your funnel. If you’re a real estate broker, labels can help you better organize leads.
Create custom labels in WhatsApp Business.
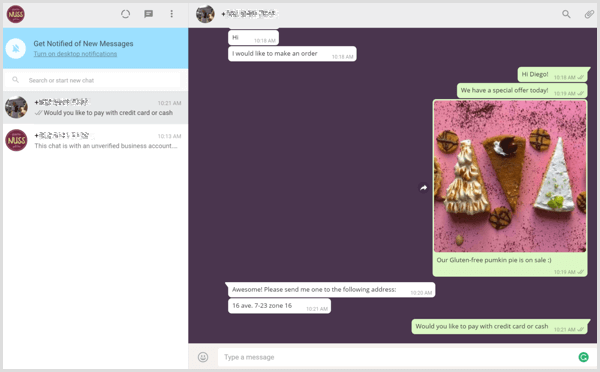
Tip: Keep in mind that WhatsApp business accounts also have the option to use WhatsApp Web on desktop to receive and reply to customers. If you have multiple people on your customer service team, WhatsApp Web may be a more effective way to respond to customers than the mobile app.
Manage business conversations using WhatsApp Web.

#5: Create a Facebook Boost Post to Promote Your WhatsApp Channel

Facebook is starting to roll out a new ad unit that combines Facebook with the WhatsApp platform. When you boost a post from your Facebook page or group, you have the option to add a click-to-WhatsApp messaging button.
Select the Send WhatsApp Message option when you boost a Facebook post.
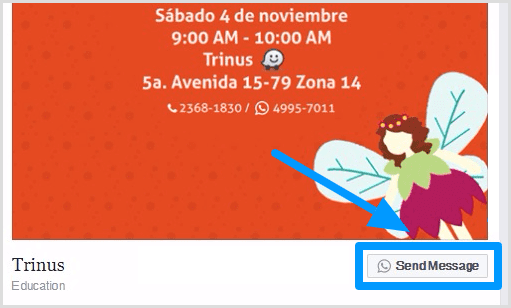
In the ad, the Send Message button will show the WhatsApp logo.
The Send Message button for your Facebook ad shows the WhatsApp logo.
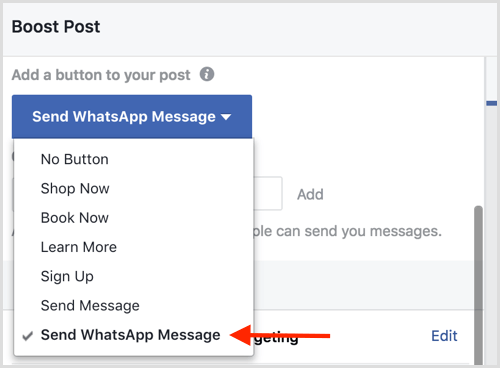
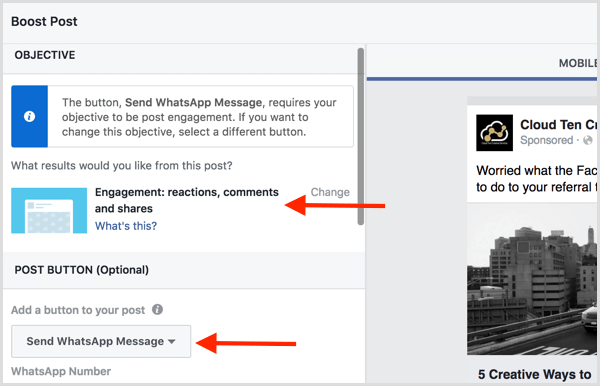
To set up this type of ad, open the post you want to use and click the Boost Post button at the bottom. In the Boost Post window that appears, select Send WhatsApp Message from the Add a Button to Your Post drop-down list. Note that your objective must be post engagement to use this button.
Choose the post engagement objective to a WhatsApp messaging button to your Facebook ad.
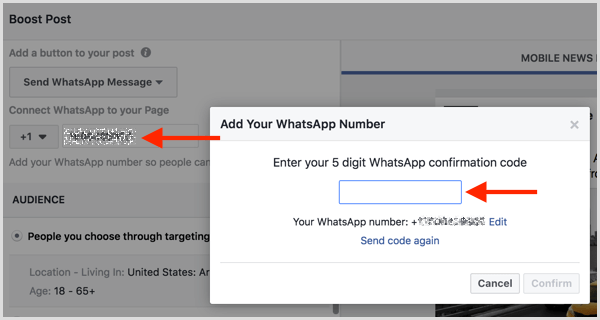
Next, type in the phone number attached to your WhatsApp account. Facebook then sends a 5-digit confirmation code to your phone. When you receive it, enter the code in the pop-up box (shown below) and click Confirm.
Enter the confirmation code you received via SMS to connect your WhatsApp Business account with Facebook.
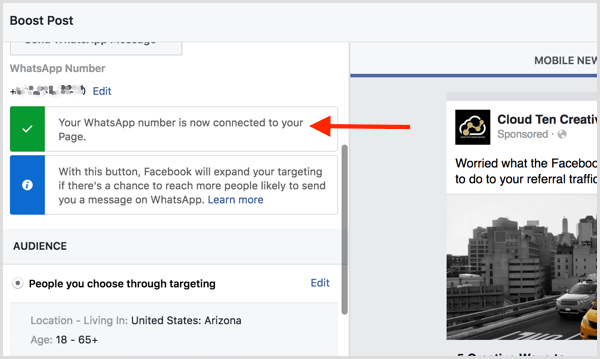
Once your WhatsApp number is connected to your Facebook page, you see a confirmation message along with a green checkmark.
Facebook confirms that you've connected your Facebook page to WhatsApp.
Next, set the targeting, budget, and duration for your ad. Then click Boost to submit it to Facebook.
When users click the Send Message button in your ad, WhatsApp will open on their phone and they can chat directly with your business.

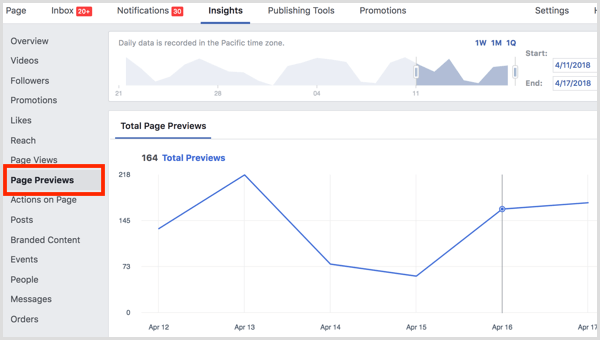
#6: View Statistics for Your Messages

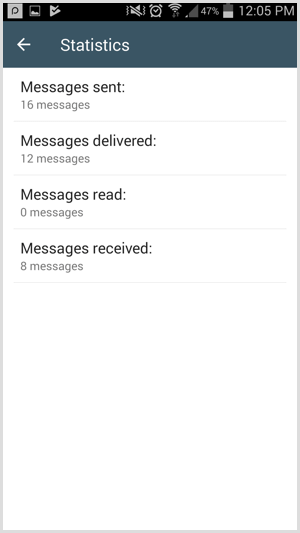
To see a general overview of your customer service performance, open your WhatsApp business account, go to Business Settings, and click the Statistics link. You can see the number of messages sent, delivered, read, and received on the platform.
View Statistics for your WhatsApp Business account.
WhatsApp Business Account Verification
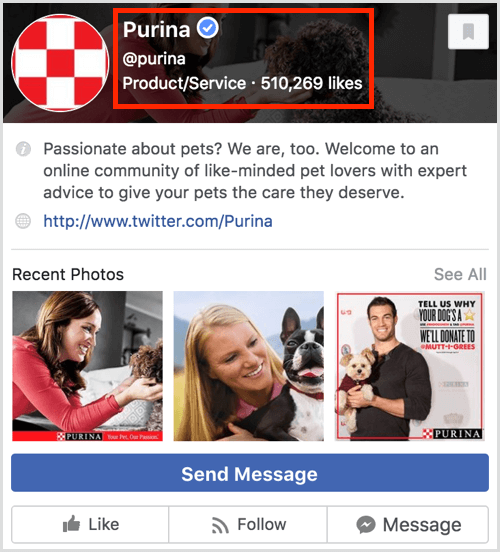
At the moment, you can’t request or pay to have your business account verified or confirmed, but expect WhatsApp to roll out a process for this. Currently, businesses will see one of the following badges in their account profile:
  • Verified: A green checkmark badge indicates WhatsApp has verified that an authentic brand owns the phone number.
  • Confirmed: A gray checkmark badge means WhatsApp has confirmed that the phone number of this account matches the phone number of the business.
  • Business account: A gray question mark badge means the account hasn’t been verified by WhatsApp.
Conclusion
With the release of WhatsApp Business, you can establish a business presence and manage customer interactions on the platform without using a WhatsApp personal account. The app is still in its infancy in terms of functionality, but expect additional features to be released in the coming months.
And along with your business account, you can run Facebook ads with a click-to-WhatsApp button to make it easy for WhatsApp users to message your team.
Share:

How to Optimize Your Facebook Page Preview in the News Feed

Are you capitalizing on the page preview shown when users hover on your page name on Facebook?
In this article, you’ll discover how to optimize your Facebook page preview to boost likes and bring new fans on board.

Why Facebook Page Previews Matter

Page previews appear when someone hovers over a link to your Facebook page. For example, people see your preview when they hover over your page in Facebook ads. This helps potential consumers learn more about the businesses advertising in their news feed.
Users see a preview when they hover over a page in Facebook ads.
People also see this preview when they hover over the linked brands and businesses in a personal profile’s About section. In this way, your current and former employees can help spread the word about your company and other companies they’ve worked for.
Users see a preview when they hover over the linked brands and businesses in a Facebook personal profile’s About section.
The preview also appears when people hover over pages tagged in post descriptions or in branded content, helping introduce users to new pages through their friends and pages they follow.
Users see a preview when they hover over pages tagged in post descriptions or in branded content.
A preview even displays when users hover over the pages similar to a page someone just liked. It’s a great way to potentially capture likes from pages in the same category or location as your business.
Users see a preview when they hover over Facebook pages similar to a page someone just liked.
Why should you worry about Facebook page previews? Your preview could be the first impression a potential consumer gets about your business, resulting in a like. Or it might be the last impression a potential consumer gets about your brand, resulting in an unlike.
Facebook emphasizes the importance of page previews by dedicating a tab of your Facebook Page Insights to them.
Find page preview metrics on the Page Previews tab in Facebook Insights.
It’s important to note that Facebook page previews will vary based on the person who sees them. Usually, the changes are subtle such as placement of the fan count. Most of the time, the fan count will be at the top of the preview.
The fan count is at the top of this Facebook page preview.
But if someone has one or more friends who like the page, the fan count will drop to highlight the friends who like the page.
The fan count in this page preview is placed below the names of friends who like the page.
With this information in mind, let’s look at the portions of your page that appear in page previews and how you can modify the details.
Tip: Before and after making the following changes, find a link to your page and hover over it to see how your preview looks. Note that you have to use a Facebook account that doesn’t have a role on your page. Anyone with a role on your page will see this instead of the preview that customers see:
Anyone with a role on your Facebook page will see this page preview instead of the preview that users see.

#1: Review Your Page’s Name, Username, and Category

At the top of your page preview, people will see your page’s name, username, and category.
The
If you haven’t configured these settings, you’ll find them on your page’s About tabClick the Edit link to customize this information as needed.
Facebook page preview edit

#2: Add a Summary and Website Link

Next on your page preview, you should see your page’s summary and your website link.
Edit your name, username, and category on the About tab of your Facebook page.
If you don’t see this information, you can visit your page’s About tab and edit the fields to add your website link and edit your page’s summary.
Add your website link and edit your Facebook page’s summary on the About tab.

#3: Confirm Your CTA and Messaging Options

Want to make sure that people who hover over your page name can learn more about or engage with your business? Make sure you give users the option to message your page and set up your page’s call-to-action (CTA) buttons.
Facebook users who hover over your page name can learn more about or engage with your business.
To turn on messagesgo to your page’s settings and visit the Messaging section.
Go to your Facebook page Settings and click the Messaging tab.
To configure your CTA buttonclick Add a Button to set it up or hover over your current CTA button to edit it.
Click Add a Button to add a CTA button to your Facebook page.

#4: Make the Most of Reviews and Ratings

If you have a local business page, reviews and ratings may appear in place of your page’s summary and website link so you want to make sure your page is collecting positive reviews. If not, make an effort to reach out to your most satisfied customers and ask them to let people know how they feel by leaving a review on your page.
Reviews and ratings may appear in the Facebook page preview for a local business.

#5: Highlight Native Photos and Videos

When you post updates to your Facebook page, be sure to post great photos and videos directly to Facebook that best represent your business. Thumbnails for photos…
A Facebook page preview showing recent photos.
…and thumbnails for videos appear beneath your page’s summary and website link, reviews and ratings, or other information specific to your page’s category.
A Facebook page preview showing recent videos.
Note that these thumbnails appear here only if you’re uploading photos and videos to your page. Thumbnails for photos and videos in link posts won’t appear in this section.
Review Your Page Preview Insights
As mentioned earlier, Facebook has a section in your page’s Insights dedicated to your Page Preview analytics. You can see trends in the number of people who have seen your page preview in a specific timeframe.
Page Preview analytics for a Facebook page.
While this data isn’t very detailed, you’ll get an idea of how many people are finding your page through Facebook. You can also compare data like your net likes in the Likes section of your page preview to see if an increase in page previews has led to an increase in likes (or unlikes).
Net Likes in Facebook page Insights.
If you notice the trend for likes climbs when the trend for page previews climbs, you can infer your page preview is making a good first impression. If you notice the trend for unlikes climbs when the trend for page previews climbs, you can infer your page preview needs some improvement to convey the right message to your fans.
Conclusion
As you can see, your Facebook page preview is a powerful way to make a good first impression on potential new fans or customers. It’s also a great way to remind people why they’re a fan of your page and initiate engagement with them throughout Facebook.

Share:

How to Easily Create Videos From Blog Posts

There’s no need to spend hours recording video with an expensive camera when you have existing content and access to free tools.
In this article, you’ll learn how to use free tools to turn blog posts into videos you can share on social media.

#1: Outline Your Storyboard

You can turn a blog post into a video pretty easily by building a slideshow presentation that communicates key ideas and converting that slideshow into a video file. To start creating the presentation, browse your blog for an evergreen post that offers useful information and transform that blog post into the text for your video.
Find the key points of your blog post and copy them over to a text file. Then shorten your copy so that each slide has no more than 10 to 15 words. Your audience will have only 4 seconds per slide to take in your ideas, and viewers won’t want to pause the video to read them.

#2: Select Free Images to Enhance Your Slides

You’ll also need beautiful photos and clip art to use in your slides. You can find royalty-free photos from sites such as UnsplashPexels, and Stock Up. Many photos from these sources have a Creative Commons license. However, each of these sites has its own terms of use, and individual images may have different licensing policies. Be sure to read the fine print before you include a photo in your video.
Also, when you use an image under a Creative Commons license, it’s good practice to credit the photographer and source for your photo. You can add these to a final credits slide in your video and link back to the photographer’s and source’s websites in the YouTube video description.
Unsplash stock photo search

#3: Build a Slideshow in Google Slides

After you gather all of the source content for your video, it’s time to create the presentation. The details in this article are based on Google Slides because it’s free and works on many operating systems. However, you can adapt the ideas in this article to PowerPoint or Keynote if you prefer.
First, create a new Google Slides presentation. From your home in Google Drive, simply click New and select Google Slides. If you want to use a theme or have a presentation template designed for your brand, apply that theme before you start. (You can apply the theme after you begin creating slides, but you can end up doing extra work to make the slides’ content fit the new theme.)
You’ll find a few themes within Google Slides, as well as from third parties online. To choose a preset theme or import a themeclick the Theme option in the toolbar and a window for browsing and importing themes appears.
Google Slides select theme
If the more highly designed themes are too busy, an alternative is to select a simple theme and then customize your slide background color and possibly the text with colors that reflect your brand. Just make sure you choose colors that have great contrast so your text is easy to read.
Next, you can start creating individual slides and adding text from your storyboard. To begin, create a title slide that reflects the title of your blog post. Your theme may offer one or more title slide layouts, which are usually a great place to begin. Click Layout from the Google Slides toolbar and select a layout that looks like a good starting point.
Google Slides select layout
Copy and paste text from your storyboard into the slides. When you have a great image to go with your slides, click the Image icon to upload the file from your hard drive. Remember that choosing from the preset slide layouts that come with your theme is the easiest way to create a professional-looking result. As you build slides, you’ll start to see your video come together.
Google Slides build presentation
Tip: You may be familiar with scene transitions, animations, and other effects built into presentation programs, and Google Slides is no exception. However, after you convert your slideshow into a video file, none of those animations are preserved. (Microsoft PowerPoint is an exception, as explained a little later.) Instead, you can build simple animations by duplicating slides and then adding to or moving items so they appear animated as the video plays.
For example, say you want two ideas to appear on the same slide, one after the other in your video. This would not only add a nice effect, but also give viewers more time to digest the ideas. First, create copies of your slide by selecting it. Then click the Slide menu and choose Duplicate Slide.
This text animation started with four slides (one original and three copies). To create the animation, you can simply delete text from the first, second, and third slides so the text appears on-screen in 4-second increments, building up to your final point in 16 seconds.
Google Slides create animation
When you’re done creating the slideshow in Google Slides, click File in the menu bar and select the Download As option. From the submenu, choose either Microsoft PowerPoint (pptx) or ODP Document (.odp). Google Slides converts your presentation into the selected file format and then your presentation downloads to your computer.

#4: Convert Your Slideshow to a Video File With Online Convert

To turn your presentation file into a video, you can use a free online service like Online Convert. On the home page, select Convert to MP4 from the Video Converter drop-down list, and you’ll see the MP4 converter.
After you upload your presentation fileselect YouTube as the video preset, leave the other options at their defaults, and click the Convert File button. When the site is done converting your file into an MP4, the video file downloads automatically to your computer.
Online Convert app create MP4 file

#5: Add Music to Your Video

If you want to add a music track to your video, you’ll need video editing software. HitFilm Express is a great free option for both Windows and Mac users. iMovie is excellent free video editing software that comes with macOS.
The simplest way to add audio is to add royalty-free background music to the video file. Both Bensound and HookSounds are good places to start looking for audio that works well with your content. After you have an audio file that you like, open your video editorand combine the audio and video files.
In HitFilm Express, you begin by importing both the video and audio into your Media library, which is a tab in the lower left of the Edit screen.
HitFilm Express import files to media library
After you select the audio file on the Media tab, you can trim the audio file to the length of your video in the Trimmer. You find the Trimmer in the upper left of the Editor. The time noted in the trimmer indicates the length of your selected media and will help you match the length of the two files.
To set an in point, which indicates where your audio starts, move the Trimmer playhead to the desired position and then click the Set In Point icon. You set an out point in the same way, using the Set Out Point icon. You then use the Trimmer’s Insert Clip icon toadd the trimmed audio to the timeline.
HitFilm Express set in and out point
Lastly, use the Trimmer’s Insert Clip icon to add the video file to the timeline, too. Then you can drag the two clips so that they line up, as shown below. Preview the timeline so you can see how the audio and video play together. When you like the result, export the file to create an MP4 file optimized for the web.
HitFilm Express timeline
Exporting a Video Directly From PowerPoint
PowerPoint contains an option to convert your slideshow into a movie. Because this converter is within PowerPoint, it preserves your transitions and animations. PowerPoint also allows you to add audio narration, and the movie export option preserves those recordings as well.
To export your slideshow as a movie from PowerPoint, click File in the menu bar and select Export from the drop-down menu. Then choose the Create a Video option. For a quality option, select Internet Quality. If you added recordings, select the option to include recordings and narration. (You can preview how the whole slideshow plays before you export the movie.)
When you’re done, click Create Video. It’s as simple as that.
PowerPoint create video options

#6: Upload Your Video to Social Media

Your video is now ready. All that’s left for you to do is upload the video to your social media profiles, especially YouTube, Facebook, and LinkedIn. You can then integrate the video into your social media marketing campaigns to build brand awareness and drive conversions.
On Facebook, you can even pay a few bucks to boost your video to reach a wider audience and get more views.
Conclusion
As video continues to be a major contender in social media marketing, you need an easy and inexpensive way to create videos. Starting from a blog post gives you the source content you need, and the free tools outlined here allow you to create simple but professional videos that represent your brand well.

Share:

Facebook Messenger Ads: How it is changing Facebook Advertising

facebook messenger ads how to create

Facebook Messenger is going to be a powerful counterpart to Email Marketing. Companies and business owners have been trying hard to build their email lists and increase the conversion rate from emails. The importance of email marketing is unquestionable, but what if you could have a subscriber list on Facebook who would directly contact you on Facebook Messenger?Sounds pretty cool, right?
Facebook Messenger can also assist you in saying a bye-bye to traditional customer support and revamp your company with a modern customer support where you can address all the customer issues on Facebook Messenger without having to deal with the laid back calling process.
If you are not sure how your business can use Facebook Messenger, look at statistics below:
Facebook messenger ads
This research highlights some very important points that we can use to connect better with our customers. It also gives us an insight on what our customers are expecting and how can we deliver it more effectively. 
So, let us look how you can use it for your business and increase your ROI.
There are two types of Facebook Messenger ads:
  1. Facebook Messenger as a Destination
  2. Facebook Messenger as a Placement 
Facebook Messenger as a Destination:
The easiest way to understand this is to know that these ads are just like any other ads you see on Facebook. They have the option to add an image, video, carousel, etc. The user sees this ad on their Desktop & Mobile newsfeed.
The only difference is that when a user clicks on this ad, it opens on Facebook Messenger instead of any other URL.
When you are creating an FB ad, this is how you can select Messenger as a destination

Facebook messenger ads
Image via Facebook
When you click on setup messages, you will see the screen below.
Image via Facebook
You can add the welcome message and other details as per your ad campaign. You can also select the customer action as buttons or quick replies. The ad will run like a normal ad and will give you the targeting capability like other ads.
This ad can be used for retargeting where you want to retarget your customers who didn’t make the purchase by answering some of their questions that you think stopped them from final purchase. This ad can also be useful if you want people to send you a message on Facebook.
If you are wondering why would you want people to message you on Facebook, read below to learn how beneficial it can be.
Facebook Messenger as a Placement:
Facebook Messenger as a placement is when users get your ads directly in their Facebook Messenger. You can select Messenger as Placement for Campaign objectives Traffic and Conversion. Messenger as Placement will be ineligible for other ad types. To know more about which ad type will be eligible for Messenger.
You can have Facebook Messenger as a Placement in two ways:
  • Messenger Home
  • Sponsored Ads
Let us look at Facebook Messenger Sponsored Ads in detail:
Facebook Messenger as a Placement Sponsored ads is where your ad will reach your customer just like they receive messages from their friends on Messenger.
However, you can only target people who have previously messaged your page in the past. So, if you do not have existing subscribers in your FB page list, it’s best to first run an ad or post that motivates people to send you a message on Facebook. And, then start Sponsored Ads.
his is how you can create Facebook Messenger Sponsored Ads as a Placement.
Step 1:
Select Sponsored Messages under Messenger in Edit Placements
Step 2:
Turn on Sponsored Messages Placement
Step 3:
Create your ad
One important point to note is that Facebook charges you for your messages based on impression irrespective of its opening rate. So, you can also use a bot to sophisticate the process and save your time and money.
Here is a great example of Sponsored Message Ads:
Source: Netimperative
As you can see, Facebook Messenger advertising is a great shift in social media advertising. It gives you the capability to engage with your customers at a very personal level and also eliminate the tedious customer care process. You can be very creative with how you can engage your customers and convert a conversation into a conversion.
So, go ahead and try your Facebook Messenger Ad and tell us how it worked for you. If you face any issues while creating your ad or if your ad didn’t benefit like you expected, just drop a comment and we will be happy to help you!
Share: