


There’s no need to spend hours recording video with an expensive camera when you have existing content and access to free tools.
In this article, you’ll learn how to use free tools to turn blog posts into videos you can share on social media.

#1: Outline Your Storyboard
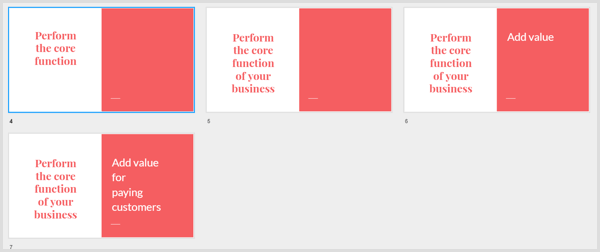
You can turn a blog post into a video pretty easily by building a slideshow presentation that communicates key ideas and converting that slideshow into a video file. To start creating the presentation, browse your blog for an evergreen post that offers useful information and transform that blog post into the text for your video.
Find the key points of your blog post and copy them over to a text file. Then shorten your copy so that each slide has no more than 10 to 15 words. Your audience will have only 4 seconds per slide to take in your ideas, and viewers won’t want to pause the video to read them.
#2: Select Free Images to Enhance Your Slides
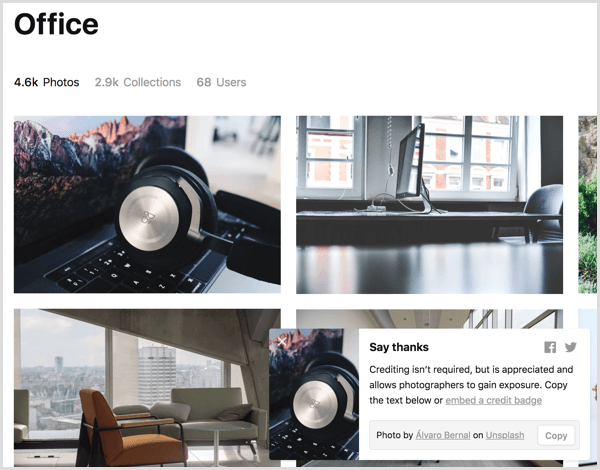
You’ll also need beautiful photos and clip art to use in your slides. You can find royalty-free photos from sites such as Unsplash, Pexels, and Stock Up. Many photos from these sources have a Creative Commons license. However, each of these sites has its own terms of use, and individual images may have different licensing policies. Be sure to read the fine print before you include a photo in your video.
Also, when you use an image under a Creative Commons license, it’s good practice to credit the photographer and source for your photo. You can add these to a final credits slide in your video and link back to the photographer’s and source’s websites in the YouTube video description.
#3: Build a Slideshow in Google Slides
After you gather all of the source content for your video, it’s time to create the presentation. The details in this article are based on Google Slides because it’s free and works on many operating systems. However, you can adapt the ideas in this article to PowerPoint or Keynote if you prefer.
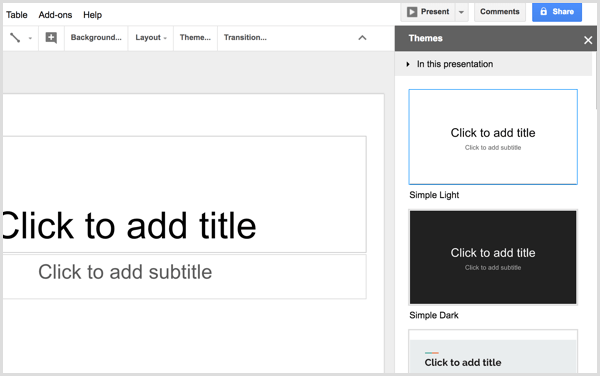
First, create a new Google Slides presentation. From your home in Google Drive, simply click New and select Google Slides. If you want to use a theme or have a presentation template designed for your brand, apply that theme before you start. (You can apply the theme after you begin creating slides, but you can end up doing extra work to make the slides’ content fit the new theme.)
You’ll find a few themes within Google Slides, as well as from third parties online. To choose a preset theme or import a theme, click the Theme option in the toolbar and a window for browsing and importing themes appears.
If the more highly designed themes are too busy, an alternative is to select a simple theme and then customize your slide background color and possibly the text with colors that reflect your brand. Just make sure you choose colors that have great contrast so your text is easy to read.
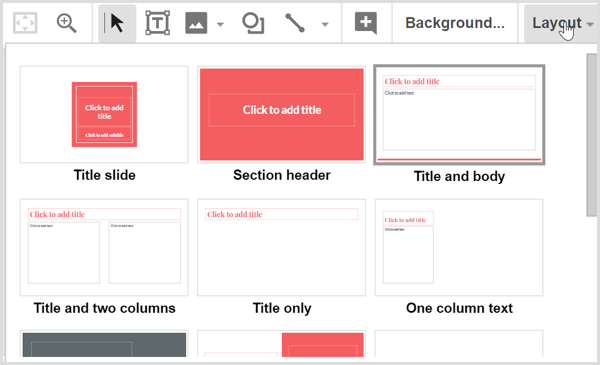
Next, you can start creating individual slides and adding text from your storyboard. To begin, create a title slide that reflects the title of your blog post. Your theme may offer one or more title slide layouts, which are usually a great place to begin. Click Layout from the Google Slides toolbar and select a layout that looks like a good starting point.
Copy and paste text from your storyboard into the slides. When you have a great image to go with your slides, click the Image icon to upload the file from your hard drive. Remember that choosing from the preset slide layouts that come with your theme is the easiest way to create a professional-looking result. As you build slides, you’ll start to see your video come together.
Tip: You may be familiar with scene transitions, animations, and other effects built into presentation programs, and Google Slides is no exception. However, after you convert your slideshow into a video file, none of those animations are preserved. (Microsoft PowerPoint is an exception, as explained a little later.) Instead, you can build simple animations by duplicating slides and then adding to or moving items so they appear animated as the video plays.
For example, say you want two ideas to appear on the same slide, one after the other in your video. This would not only add a nice effect, but also give viewers more time to digest the ideas. First, create copies of your slide by selecting it. Then click the Slide menu and choose Duplicate Slide.
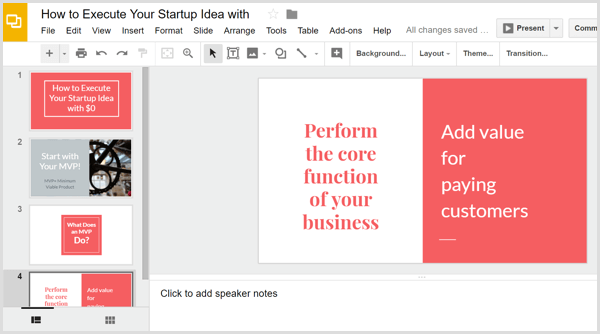
This text animation started with four slides (one original and three copies). To create the animation, you can simply delete text from the first, second, and third slides so the text appears on-screen in 4-second increments, building up to your final point in 16 seconds.
When you’re done creating the slideshow in Google Slides, click File in the menu bar and select the Download As option. From the submenu, choose either Microsoft PowerPoint (pptx) or ODP Document (.odp). Google Slides converts your presentation into the selected file format and then your presentation downloads to your computer.
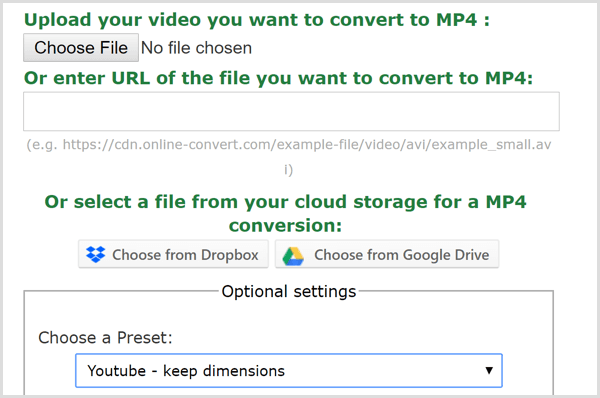
#4: Convert Your Slideshow to a Video File With Online Convert
To turn your presentation file into a video, you can use a free online service like Online Convert. On the home page, select Convert to MP4 from the Video Converter drop-down list, and you’ll see the MP4 converter.
After you upload your presentation file, select YouTube as the video preset, leave the other options at their defaults, and click the Convert File button. When the site is done converting your file into an MP4, the video file downloads automatically to your computer.
#5: Add Music to Your Video
If you want to add a music track to your video, you’ll need video editing software. HitFilm Express is a great free option for both Windows and Mac users. iMovie is excellent free video editing software that comes with macOS.
The simplest way to add audio is to add royalty-free background music to the video file. Both Bensound and HookSounds are good places to start looking for audio that works well with your content. After you have an audio file that you like, open your video editorand combine the audio and video files.
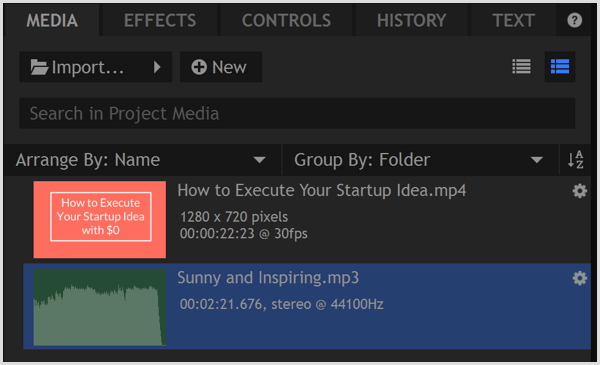
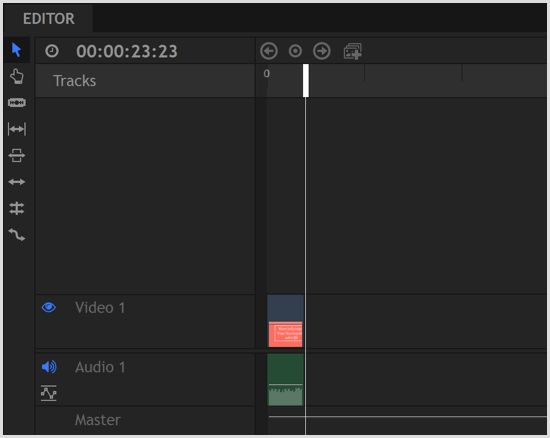
In HitFilm Express, you begin by importing both the video and audio into your Media library, which is a tab in the lower left of the Edit screen.
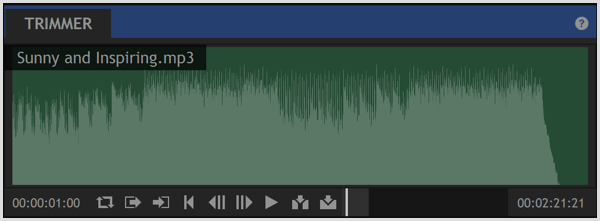
After you select the audio file on the Media tab, you can trim the audio file to the length of your video in the Trimmer. You find the Trimmer in the upper left of the Editor. The time noted in the trimmer indicates the length of your selected media and will help you match the length of the two files.
To set an in point, which indicates where your audio starts, move the Trimmer playhead to the desired position and then click the Set In Point icon. You set an out point in the same way, using the Set Out Point icon. You then use the Trimmer’s Insert Clip icon toadd the trimmed audio to the timeline.
Lastly, use the Trimmer’s Insert Clip icon to add the video file to the timeline, too. Then you can drag the two clips so that they line up, as shown below. Preview the timeline so you can see how the audio and video play together. When you like the result, export the file to create an MP4 file optimized for the web.
Exporting a Video Directly From PowerPoint
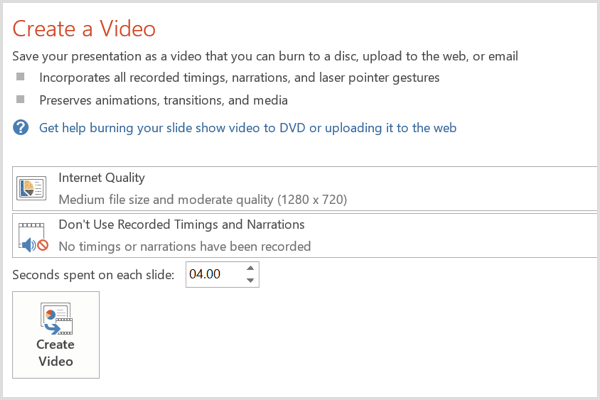
PowerPoint contains an option to convert your slideshow into a movie. Because this converter is within PowerPoint, it preserves your transitions and animations. PowerPoint also allows you to add audio narration, and the movie export option preserves those recordings as well.
To export your slideshow as a movie from PowerPoint, click File in the menu bar and select Export from the drop-down menu. Then choose the Create a Video option. For a quality option, select Internet Quality. If you added recordings, select the option to include recordings and narration. (You can preview how the whole slideshow plays before you export the movie.)
When you’re done, click Create Video. It’s as simple as that.
#6: Upload Your Video to Social Media
Your video is now ready. All that’s left for you to do is upload the video to your social media profiles, especially YouTube, Facebook, and LinkedIn. You can then integrate the video into your social media marketing campaigns to build brand awareness and drive conversions.
On Facebook, you can even pay a few bucks to boost your video to reach a wider audience and get more views.
Conclusion
As video continues to be a major contender in social media marketing, you need an easy and inexpensive way to create videos. Starting from a blog post gives you the source content you need, and the free tools outlined here allow you to create simple but professional videos that represent your brand well.


